Part one of this series was to mainly get honeyd up and running. Hopefully you also took away from part one that the configuration file, honeyd.conf, is the key to making things work smoothly and properly. Now that you’ve got honeyd up and running let’s tweak honeyd.conf so that we have multiple honeypots running on one installation of honeyd. One honeypot is great but having three or four is even better. Part two is dedicated to showing you how to properly setup multiple honeypots in honeyd. In part one we only emulated a Windows device via the line below in honeyd.conf
set windows personality "Microsoft Windows XP Professional SP1" set windows default tcp action reset
The personality tries to emulate what device you are trying to pretend to be. There are plenty of other personalities we could choose from so when setting up multiple honeypots you may want to emulate other devices besides a standard Windows device. Maybe you’d like to emulate a Solaris box, PBX system, or if you are going to emulate a Windows device make it real juicy to an attacker by making it a Windows 98 device. You’ve got plenty of options when choosing a personality for your honeypot. Honeyd takes advantage of nmap and the way it fingerprints devices. The list of personalities is located in the nmap.prints file, you should be able to find this file by using the following command
You can view this file using less, for me I issued the following command.
less /usr/share/honeyd/nmap.prints
Nmap has a version of this file as well named “nmap-os-db”. The nmap.prints and the nmap-os-db may or may not match up depending on your versions of nmap and honeyd. My nmap-os-db is in the following location.
/usr/share/nmap/nmap-os-db
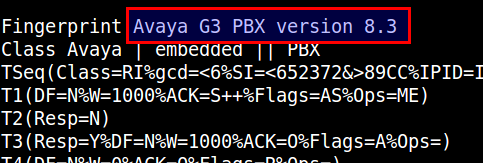
Within nmap.prints anything that follows the word “Fingerprint” is available as a personality. As an example below the string “Avaya G3 PBX version 8.3” can be used as a personality in honeyd.conf

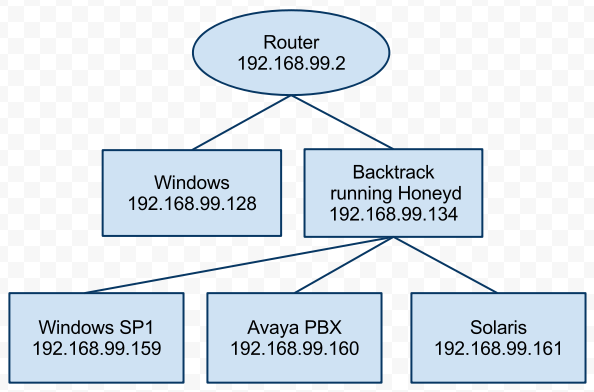
In my example I will emulate this Avaya PBX device and I will also emulate a Soalris device. So a diagram of my setup looks like the following.

So now that I’ve decided to also emulate a Solaris and Avaya device I’ll need to add both of these do honeyd.conf. Basically all you’ll need to do is copy and paste from the Windows device you’ve already setup in honeyd.conf then make some minor modifications such as the personality. My honeyd.conf for all three of these honeypots is below.
create default
set default default tcp action block
set default default udp action block
set default default icmp action block

create windows
set windows personality "Microsoft Windows XP Professional SP1"
set windows default tcp action reset
add windows tcp port 135 open
add windows tcp port 139 open
add windows tcp port 445 open

create avaya
set avaya personality "Avaya G3 PBX version 8.3"
set avaya default tcp action reset
add avaya tcp port 4445 open
add avaya tcp port 5038 open

create solaris
set solaris personality "Avaya G3 PBX version 8.3"
set solaris default tcp action reset
add solaris tcp port 22 open
add solaris tcp port 2049 open

set windows ethernet "00:00:24:ab:8c:12"
set avaya ethernet "00:00:24:ab:8c:13"
set solaris ethernet "00:00:24:ab:8c:14"
dhcp windows on eth1
dhcp avaya on eth1
dhcp solaris on eth1
After you’ve added this information to honeyd.conf go ahead and run honeyd with the options discussed in part one, you should see the following.
root@bt:~# honeyd -d -f honeyd.conf
Honeyd V1.5c Copyright (c) 2002-2007 Niels Provos
honeyd[2697]: started with -d -f honeyd.conf
Warning: Impossible SI range in Class fingerprint "IBM OS/400 V4R2M0"
Warning: Impossible SI range in Class fingerprint "Microsoft Windows NT 4.0 SP3"
honeyd[2697]: listening promiscuously on eth1: (arp or ip proto 47 or (udp and src port 67 and dst port 68) or (ip )) and not ether src 00:0c:29:88:e6:db
honeyd[2697]: [eth1] trying DHCP
honeyd[2697]: [eth1] trying DHCP
honeyd[2697]: [eth1] trying DHCP
honeyd[2697]: Demoting process privileges to uid 65534, gid 65534
honeyd[2697]: [eth1] got DHCP offer: 192.168.99.159
honeyd[2697]: Updating ARP binding: 00:00:24:c5:59:29 -> 192.168.99.159
honeyd[2697]: [eth1] got DHCP offer: 192.168.99.160
honeyd[2697]: Updating ARP binding: 00:00:24:02:ac:73 -> 192.168.99.160
honeyd[2697]: [eth1] got DHCP offer: 192.168.99.161
honeyd[2697]: Updating ARP binding: 00:00:24:68:0c:45 -> 192.168.99.161
honeyd[2697]: arp reply 192.168.99.159 is-at 00:00:24:c5:59:29
honeyd[2697]: arp reply 192.168.99.160 is-at 00:00:24:02:ac:73
honeyd[2697]: arp reply 192.168.99.161 is-at 00:00:24:68:0c:45
honeyd[2697]: Sending ICMP Echo Reply: 192.168.99.159 -> 192.168.99.254
honeyd[2697]: arp_send: who-has 192.168.99.254 tell 192.168.99.159
honeyd[2697]: Sending ICMP Echo Reply: 192.168.99.160 -> 192.168.99.254
honeyd[2697]: Sending ICMP Echo Reply: 192.168.99.161 -> 192.168.99.254
honeyd[2697]: arp_recv_cb: 192.168.99.254 at 00:50:56:ec:10:84
If everything has gone smooth up to this point you’ve gotten output similar to above. So currently we’ve got three honeypots running on one installation of honeyd. Now the proof is in the pudding by port scanning these devices and see if the ports are open and what OS nmap claims it to be. DHCP gave our Avaya device an IP address of 192.168.99.160, let’s port scan for the two open ports and a port we know to be closed and see what results we get.
travis@tht:~/documents$ nmap -p 4445,5038,5555 192.168.99.160

Starting Nmap 5.00 ( http://nmap.org ) at 2011-06-15 01:25 EDT
Interesting ports on 192.168.99.160:
PORT     STATE  SERVICE
4445/tcp open   unknown
5038/tcp open   unknown
5555/tcp closed freeciv

Nmap done: 1 IP address (1 host up) scanned in 1.18 seconds
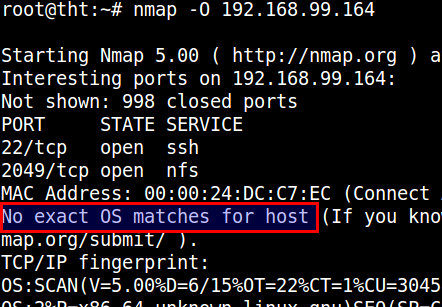
Looks like everything is on the up and up with our Avaya device. Port 5555 is closed because we did not define it in honeyd.conf. I’ll spare you with the nmap scan of the Solaris device but everything was operating as normal for it as well. So the ports are open but how well is this personality thing working? Nmap can try and determine the OS of a device through a number of TCP exchanges. Honeyd tries to use the nmap fingerprint database to send the appropriate TCP responses to a nmap scan so that the personality you’ve assigned to your template will respond as it should. This doesn’t always work properly. New versions of nmap are constantly coming out which means the nmap fingerprint database is changing as well. So nmap may respond properly or it may not, this will just depend on the version of nmap you or an attacker is scanning with. It will also depend on the nmap.prints that honeyd uses as well. You can perform an OS detection in nmap by providing it the -O option, let’s try scanning our Solaris device and see what it returns.

Seeing how this might happen you don’t want to totally rely on the personality in honeyd. The best idea is to open up ports that are common to a particular device. For instance most Linux and Solaris devices have port 22 open while routers and switches will probably have port 161 open (SNMP). The configuration is totally up to you but trying to make your honeypot as sweet as possible is the main goal.
So adding multiple honeypots to your honeyd install is fairly straightforward but there are some things to consider when setting it up. Other topics such as email alerts are coming but for now make sure you can get multiple honeypots running via honyed.