The purpose of this tutorial is to give a quick, concise overview of how to secure your communications through a non-trusted or insecure channel. You could also use this tutorial to evade organizational firewalls and web filters but, I am more concerned about keeping my communications private rather than evading organizational filters. I have seen other tutorials that show how to accomplish tunneling http traffic over SSH but not in a very simple manner, so I hope this tutorial will accomplish this goal as well as help others. As always your feedback is welcome, either by commenting on this article or via my contact form.
Prerequisites:
- Remote PC running an SSH server. Windows XP default does not come with an SSH client / server, so I recommend OpenSSH. Most Linux distributions already have installed a SSH client / server that can be used.
- Determine which ports you are going to use? It is sometimes difficult to determine which ports you are allowed to use but most organizations are going to have port 80, 443, and most likely 22 open for communication. In this tutorial we are going to use ports 22 and 80 for our tunneling although you can use any port that is open.
Tunneling with Windows XP, IE (internet explorer), Firefox, and Putty (SSH client):
I recommend the Putty client when using XP because it’s free and easy, but you can use any SSH client. For this tutorial I will only focus on Putty. So the first step is to configure Putty for tunneling. Click on the “Tunnels” tab underneath the branch of “SSH” within Putty. There under the Source port form you will add what port will be doing all of the forwarding. I have chosen to use port 80 as most organizations allow the use of this port. You will also put in the IP address of your remote PC that is running a SSH server. You’ll also need to highlight the button that says dynamic. A screen shot of this can be seen in Figure 1.

Figure 1: Putty port forwarding configuration page
Once you have done this click the Add button, this will create the forwarded port for the session. You will notice that it puts a letter beside the port you have chosen. This can be seen in figure 2.
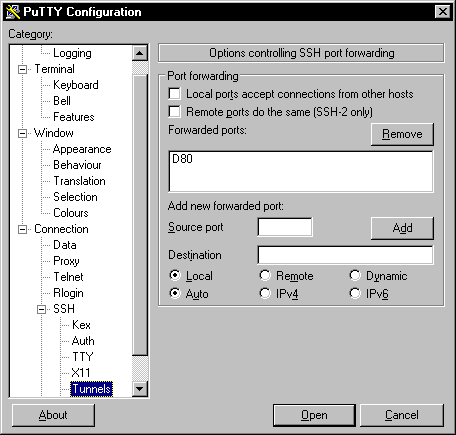
Figure 2: Add port and destination settings
Once you have set up port forwarding you can then go back to the main “Session” page and type in the IP address of your remote PC. You can also see that I am connecting to the remote SSH server on port 22. This could easily be changed to a port of your choosing. If your organization doesn’t allow communication on port 22 but does allow port 443 simply put 443 in the port form. If this were the case you need to make sure that the remote SSH server is listening on port 443 instead of the default 22. Once you have done this you can save your session so that you can easily connect the next time. You can see that I have named my session HTTPtunnelViaSSH in Figure 3.

Figure 3: Putty main menu
Now click open and another window will open asking for authentication credentials on the remote PC. Once connected the cursor will move down to the next line, this is the normal operation of Putty. If you didn’t input your authentication credentials correctly you will get a message stating so. A successful connection with Putty can be seen in Figure 4.
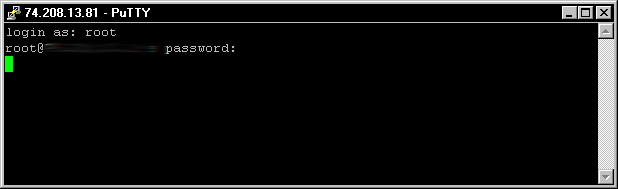
Figure 4: Successfull connection via Putty
Now once a successful connection has been made with Putty we need to configure our browser to use the SSH proxy so that all of our HTTP traffic is funneled over our secure connection. We will first configure Firefox. The actual steps to get to the “Connection Settings” within Firefox may vary depending on which version you’re running but generally the path is: Tools » Options » Advanced Tab » Network Tab » Settings. Once there you will need to highlight the “Manual proxy configuration”, then for the “SOCKS Host” use localhost. The port will be port 80 in this case because we told Putty to tunnel our connection via port 80, YMMV (your method may vary). The screen shot of this configuration can be seen in Figure 5.
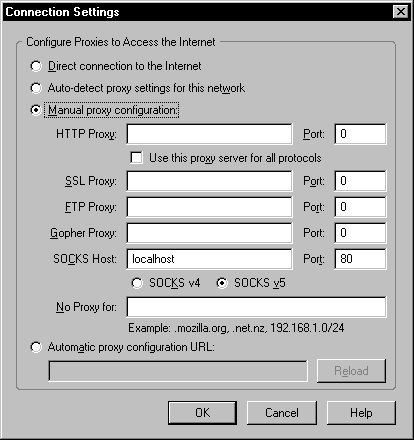
Figure 5: Firefox configuration settins for tunneling HTTP over SSH
The same concept applies when configuring internet explorer. Once again the location of the “Proxy settings” for internet explorer will vary depending upon which version you are running but generally the path is: Tools » Internet Options » Connections tab » LAN settings. Here you will need to check the box that says “Use a proxy server for your LAN”, this screenshot can be seen in Figure 6.
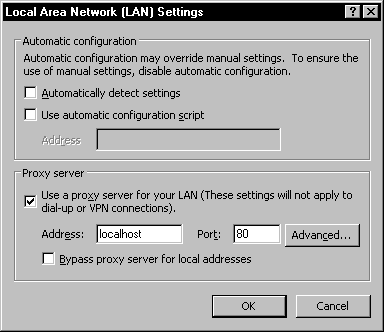
Figure 6: Proxy server settings for Inernet Explorer
You must then click on the “Advanced” tab to fill out the Socks connection form. Once again we’ll use the “localhost” as the host and port 80 for our tunnel. This screenshot can be seen in Figure 7.
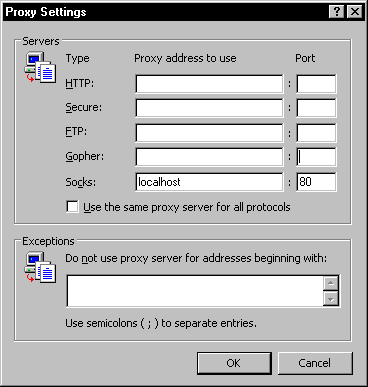
Figure 7: Socks settings for Internet Explorer
Once you have completed this step you are done, just click all of the OK buttons. You should now be tunneling all of your HTTP connections to your remote PC in a secure shell, congratulations. You have now stuck it to the man, whomever that may be.
Tunneling HTTP via SSH with Linux, Firefox, and SSH:
The procedures for tunneling HTTP traffic in Linux is almost exactly the same as it is in Linux, the only exception being the SSH client. The operating systems have really nothing to do with this whole process. There are numerous SSH clients that can be used with Linux although most distributions come with a SSH client. I will be using the command line interface as oppose to a GUI interface. So using your favorite shell use the following command.
ssh travis@YourRemotePC -D 80
After issuing this command you will be prompted for your password. Keep in mind that you may need to be “root” in order to run this command. Unlike Putty you will be given the prompt for the remote PC instead of the cursor going to the next line. After the connection has been established just go into the settings for Firefox, as seen in figure 5, and type in “localhost” and which port you are forwarding your traffic. Once again we could have chosen any open port to tunnel out HTTP traffic. This is accomplished with the -D option within the SSH command, instead of 80 you could have chosen port 443. That’s it for Linux, you are now keeping your communications private and secure, congrats.
References:
http://polishlinux.org/apps/ssh-tunneling-to-bypass-corporate-firewalls/, http://www.forniol.cat/?p=50