My tool of choice when it comes to fingerprinting SSL is OpenSSL. There are other tools out there such as thcsslcheck and ssl digger but in my experience these tools tie your hands when you want granular detail. It’s best to get it straight from the horse’s mouth » OpenSSL. This tutorial focuses on fingerprinting the ciphers and protocols supported by a SSL server, you can obtain tons of information from OpenSSL but this tutorial will not dig into all those aspects. Also this tutorial won’t go into the installation of OpenSSL on your OS just the usage thereof. The first step/command is to determine what kind of ciphers a SSL server may use.
This is done by issuing the command
Output of this command can be seen below.
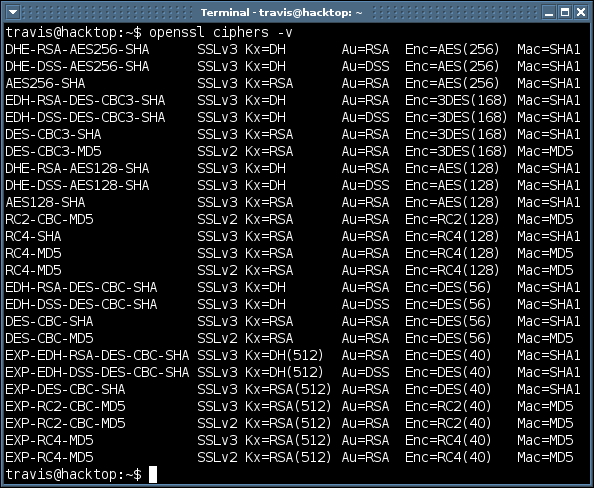
I use this command on a consistent basis because it lists ciphers from strongest to weakest. So when looking at output from the OpenSSL command you can refer to this list to see how strong or weak the cipher support may be. The “openssl ciphers -v” command has nothing to do with what cipher the web server you are trying to fingerprint supports, “openssl ciphers -v” simply lists the ciphers that OpenSSL can check. I repeat the “openssl ciphers -v” command has nothing to do with the web server you are fingerprinting. You can also check out the man page for additional options when it comes to listing ssl ciphers.
The command you’ll use the most is
but always with options. The “s_client” argument emulates a SSL client that can connect to a remote device running a SSL service. Another helpful option is “-connect”. You’ll need to supply a name/IP and a port (default port is 4433). Enough talking about the commands lets take a look at some examples.

The command above is the basic template you’ll use to fingerprint a web server that supports SSL. Instead of IP address you could also use the domain name (e.g. travisaltman.com). See the example below.
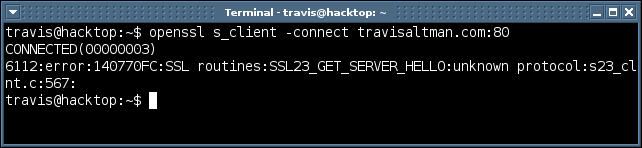
You’ll notice that an error message is generated in the example above, that’s because no SSL service is listening on port 80 at travisaltman.com. This is a typical error message you will see if openssl fails to connect with a SSL service. Now lets see what a successful connection would look like.
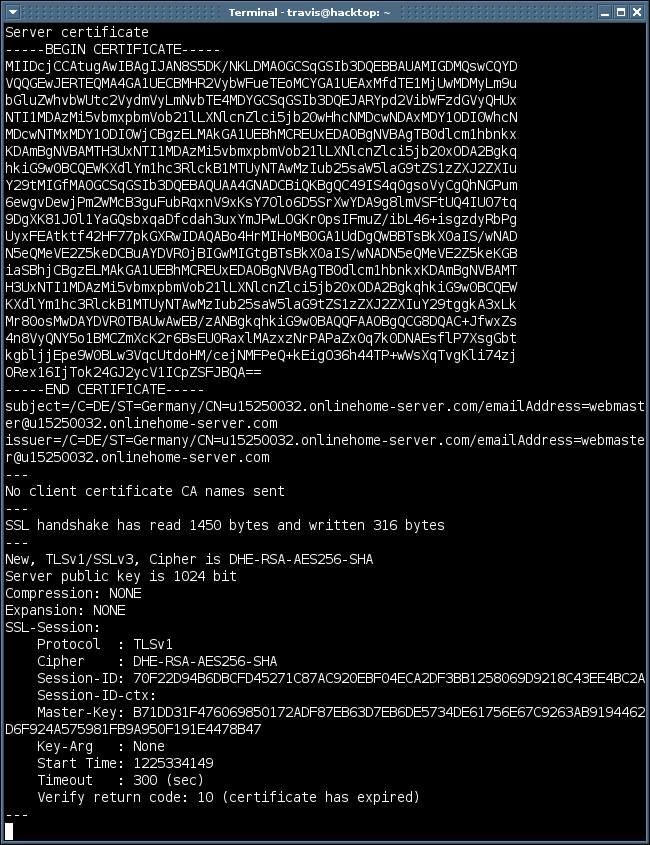
The connection may seem to hang but you can kill it with a “Q” or “Cntrl C”, the connection will also eventually timeout. You’ll first notice how much information you get back from the server via the openssl command, initially it can be overwhelming. When it comes to fingerprinting I tend to focus on the “SSL-Session” section because it tells you what protocol and cipher is being used for the communication. In the “SSL-section” above you see that travisaltman.com supports the TLSv1 protocol and the cipher is DHE-RSA-AES256-SHA. This is great that it gives us this information but when it comes to fingerprinting we’ll want to know what other protocols and ciphers the web server supports. Let’s say we wanted to know if a web server supports SSLv2 instead of SSLv3 or TLSv1. The command below tells openssl to only connect using SSLv2, this is done with the “-ssl2” option.

A truncated version of successful output from this command can be seen below.
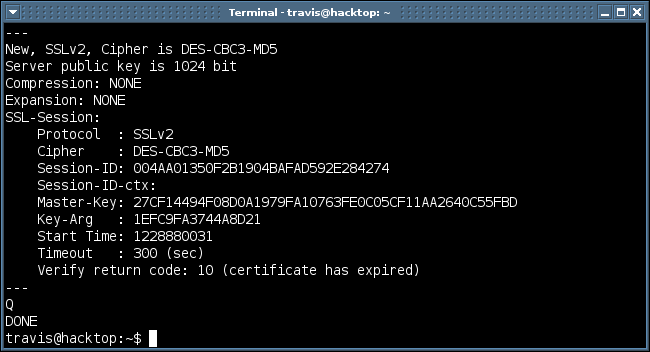
So you see that my site supports both SSLv2 and SSLv3, in this case the default cipher for communicating over SSLv2 is the DES-CBC3-MD5 cipher. You’ll notice from the “openssl ciphers -v” command that this is the strongest SSLv2 cipher with a key size of 168. You may then be wondering if this SSL server would support weaker SSLv2 keys and also weaker SSLv3 keys. In order to get this granular you would have to specify within openssl which ciphers to check. This is the reason why I love fingerprinting with openssl as oppose to those tools I mentioned at the beginning of this article. So let’s say you wanted to know if a SSL server supported the weakest SSLv2 cipher, which according the output of “openssl ciphers -v” is EXP-RC4-MD5, you can issue the command below.
openssl s_client -ssl2 -cipher EXP-RC4-MD5 -connect travisaltman.com:443
A truncated version of successful output from this command can be seen below.
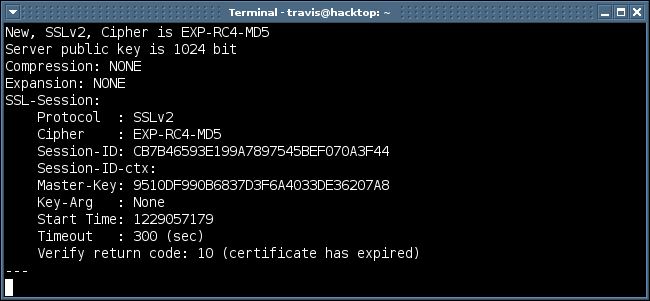
So this proves that my SSL server supports the weakest SSL cipher (40 bit key) possible. Looking through the “openssl ciphers -v” output you’ll notice another SSLv2 cipher that supports 40 bit (EXP-RC2-CBC-MD5). If you wanted to figure out if the SSL server supports either one of these SSLv2 40 bit ciphers you could issue the command below.
openssl s_client -ssl2 -cipher EXP-RC4-MD5:EXP-RC2-CBC-MD5 -connect travisaltman.com:443
The -cipher option behaves like an OR, meaning if any cipher in that colon separated list is found supported by the SSL server the command will execute successfully. Taking a look at an example may clear things up a bit. Let’s fingerprint our buddies over at thepiratebay.org and see what ciphers they support.
openssl s_client -cipher AES256-SHA -connect thepiratebay.org:443
I won’t bore you with the output, thepiratebay.org does support this strong cipher, now let’s try the weakest cipher.
openssl s_client -cipher EXP-RC4-MD5 -connect thepiratebay.org:443
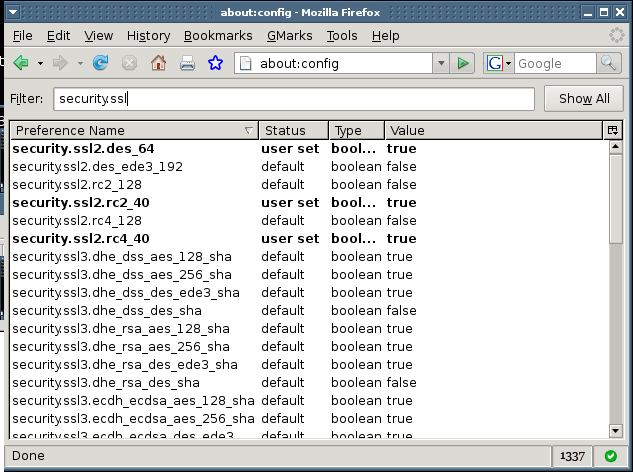
No dice, they do not support this weak encryption. Now if you combined these ciphers into one option (-cipher AES256-SHA:EXP-RC4-MD5) you would get successful output. So the point is to be careful when going through the fingerprinting process as you may think a SSL server supports a weak cipher when in fact they don’t. So after you have gone through this process and determined what ciphers and protocols the SSL sever supports what should you take away? This is a very good question and one that lots of people have opinions about. The real answer is it depends on what kind of risk you are willing to accept and how easily accessible you want your application to be. In most cases I would recommend only supporting a SSLv3/TLSv1 256 bit cipher because it’s so easy to implement. Only supporting 256 bit may mean limited access, especially to legacy applications but this is becoming less and less common. Most modern browsers and applications can now easily handle the higher key ciphers. I would also mention numerous vulnerabilites found within SSLv2 including the rollback vulnerability from three years ago. So applications that transmit sensitive information may not want to support SSLv2 at all. Keep in mind that most browsers will attempt to communicate with the highest possible cipher. So even if your SSL server supports SSLv2 for backwards compatibility odds are most users will communicate with the strongest SSLv3/TLSv1 cipher your server supports. You don’t have to solely rely on openssl, you could also test in Firefox if your SSL server allows communications on weaker ciphers. Simply type about:config in the address bar of Firefox, then in the filter type “security.ssl”. From there you can enable and disable various ciphers and see if your SSL sever allows the communication. A screen shot of this can be seen below.
That pretty much wraps up this tutorial on fingerprinting SSL. In my spare time I wrote a shell script that automated this process for me given a list of IP’s that were running a SSL sever. This shell script is not ready for prime time but I hope to release a “tools” section soon and place some of my other scripts in there as well. I’m no guru on this subject it’s just simply my experience. As always your feedback is welcome.
travis@hacktop:~$ more references
http://h71000.www7.hp.com/doc/83final/BA554_90007/rn01.html